The SheepStation LIVE Broadcast Manager is a powerful, web-based tool that allows Pole managers to control live broadcasts, manage pre-recorded messages and announcements, and interact with village listeners seamlessly. This guide will walk you through the steps to effectively use the SheepStation LIVE Broadcaster features, ensuring smooth delivery of announcements and programs.
-
Getting Started
Before you begin using LIVE Broadcast Manager, ensure that:
- WireGuard VPN is installed and active.
- You have the necessary permissions. Pole managers should have the appropriate access rights to use LIVE Broadcast Manager features.
You will need the following information which will be supplied by Reach Beyond:
- VPN Gateway configuration file for WireGuard
- Username and Password for logging into the Internet broadcaster
- URL for accessing the SheepStation Pole and Device Manager


-
Logging In
- Open Your Web Browser: Use a modern browser like Chrome, Firefox, or Edge for optimal performance.
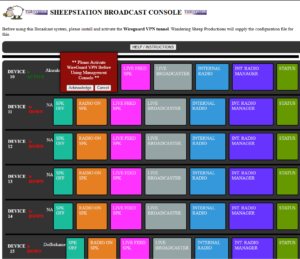
- Navigate to Your SheepStation Pole and Device Manager, this will be a URL provided by Reach Beyond
- ACTIVATE YOUR WIREGUARD VPN
- Access the LIVE Broadcast Manager Interface:
- Click on the “LIVE Broadcaster” button for one of the poles you want to broadcast to. If you are broadcasting to multiple poles this interface will broadcast to all pole loudspeakers that you activate
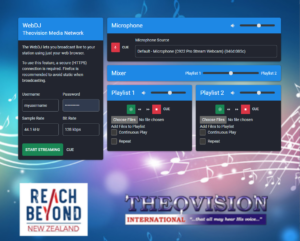
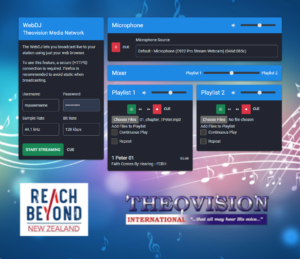
- Enter Your Credentials on left side of LIVE Broadcaster Console :
- Username: Your assigned username.
- Password: Your secure password.
- Click “Start Streaming”
-
Navigating the LIVE Broadcaster Console
The LIVE Broadcaster Console is designed to be user-friendly, featuring several key areas:
- Dashboard: Overview of current broadcast status, including active listeners and now-playing information.
- Library: Access to all your uploaded media files.
- Playlists: Create, edit, and manage your broadcast playlists.
- Live Controls: Tools for managing live broadcasts, including play, pause, skip, and volume controls.
- Settings: Customize your broadcasting preferences and audio settings.
-
Managing Your Library
Viewing Your Media Library
- Go to the “Library” Section:
- Located in the main navigation menu.
- Browse Your Tracks:
- View all uploaded songs, jingles, and other audio files.
- Filter and Search:
- Use search bars and filters to find specific tracks quickly.
Uploading New Media
- Click “Add Media”:
- Usually found at the top-right corner of the Library page.
- Select Files:
- Upload from your computer or drag-and-drop files into the upload area.
- Organize Metadata:
- Fill in song details like title, artist, album, and genre for better organization.
- Save: Ensure all new media is correctly uploaded and visible in your library.
Note: Supported file formats typically include MP3, WAV, OGG, and FLAC. Check your Azuracast settings for any specific requirements.
-
Creating and Managing Playlists
Creating a New Playlist
- Navigate to “Playlists”:
- Found in the main menu alongside Library.
- Click “Create New Playlist”:
- Enter a name for your playlist.
- Add Tracks:
- Select songs from your library and add them to the playlist.
- Order Tracks:
- Drag and drop to arrange the sequence of songs.
- Save Playlist:
- Ensure your playlist is saved and ready for broadcasting.
Editing Existing Playlists
- Select the Playlist:
- Click on the playlist you wish to edit.
- Modify Tracks:
- Add, remove, or reorder songs as needed.
- Save Changes:
- Always save after making edits to update the playlist.
Deleting a Playlist
- Choose the Playlist:
- Navigate to the playlist you want to remove.
- Click “Delete”:
- Confirm deletion when prompted.
-
Live Broadcasting
Preparing for a Live Broadcast
- Select Your Playlist:
- Choose the playlist you wish to broadcast.
- Set Up Your Microphone:
- Ensure your microphone is connected and functioning.
- Check Audio Settings:
- Adjust input levels and ensure clear audio quality.
Starting the Broadcast
- Go to “Live Controls”:
- Located within the LIVE Broadcaster console.
- Click “Start Broadcast”:
- This will begin streaming your selected playlist.
- Monitor the Dashboard:
- Keep an eye on listener stats and stream health.
-
Using Broadcasting Controls
Playback Controls
- Play/Pause: Control the playback of your current track.
- Skip/Next: Move to the next track in the playlist.
- Previous: Return to the previous track if needed.
Volume Control
- Master Volume Slider: Adjust the overall broadcast volume.
- Microphone Volume: Control the level of your live microphone input.
Additional Features
- Auto-DJ Integration: Allow the system to automatically handle track transitions when you’re not actively managing them.
- Cue Points: Set specific points in tracks for live mixing or announcements.
- Monitoring Your Broadcast
Listener Statistics
- Active Listeners: View real-time data on how many listeners are tuned in.
- Geographical Data: See where your listeners are located.
Stream Health
- Latency and Buffering: Monitor any delays or buffering issues.
- Error Logs: Check for any streaming errors that may need attention.
Now Playing Information
- Current Track: See what song is currently playing.
- Upcoming Tracks: Preview the next songs in the playlist for smooth transitions.
9. Ending Your Broadcast Session
Stopping the Broadcast
- Go to “Live Controls”:
- Within the LIVE Broadcaster interface.
- Click “Stop Broadcast”:
- This will end the live stream.
- Confirm Action:
- Ensure that the broadcast has successfully stopped.
- TURN OFF SPEAKERS on each pole using SheepStation Pole and Device Manager
-
10. Best Practices
- Prepare Playlists in Advance: Have your music and content organized to prevent downtime during live broadcasts.
- Test Equipment: Regularly check your microphone and audio settings to ensure clear sound quality.
- Engage with Your Audience: Interact with listeners to build a loyal community.
- Monitor Stream Health: Keep an eye on your broadcast’s technical aspects to maintain a professional sound.
- Stay Updated: Regularly update Azuracast to benefit from the latest features and security improvements.
-
11. Troubleshooting
Common Issues and Solutions
- No Sound During Broadcast:
- Check Audio Inputs: Ensure your microphone and system audio are correctly configured.
- Verify Volume Levels: Adjust the master and microphone volumes as needed.
- Can’t Add Tracks to Playlist:
- Check Permissions: Ensure you have the necessary rights to modify playlists.
- Supported Formats: Confirm that the track format is supported by LIVE Broadcaster.
- Broadcast Not Starting:
- Internet Connection: Ensure a stable internet connection.
- Firewall Settings: Check if any firewall is blocking the streaming ports.
- Listener Dropouts:
- Bandwidth Issues: Verify that your server has sufficient bandwidth for streaming.
- Server Load: Ensure the server isn’t overloaded with other tasks.

